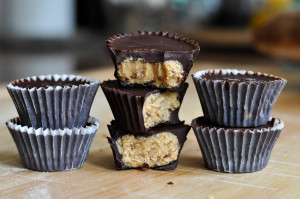
Homemade Peanut Butter Cups
Should yield about 18 peanut butter cups
Ingredients
Ingredients
- ¾ Cup semi-ground peanuts (see photo)
- Tablespoon or so fresh peanut butter
- 5-7 Deglet Dates
- 1 Bar 86% cocoa chocolate (I use Ghirardelli)
- Handful 69% dairy free chocolate chips (I use the Enjoy Life brand)
- Sea salt to taste
Equipment
- Mini muffin liners (or regular muffin liners if you want to make the classic size)
- Flat tray that will fit in your freezer
- Double boiler (or two pots that will work as a double boiler)
Instructions
- Measure your partially ground peanuts (they should have a paste like consistency) into a mid-size bowl and add in your fresh peanut butter.
- Using a mini food processor chop your dates until you have a smooth paste.
- Gradually add the date paste and sea salt into your peanut mixture. Mix very well to fully incorporate the sea salt and dates into the peanut butter. As you add the dates/salt, taste test frequently until the peanut butter reaches your desired salty/sweet balance.
- Once your peanut butter filling is complete, set aside and set up a double boiler (I use two slightly different sized pots that nest into each other; there's no need to invest in expensive equipment. It is easier if one of the pots has a spout to assist in pouring out the chocolate).
- Once the water in the double boiler is simmering, break apart your chocolate bar and place in the boiler. Toss in a handful of chocolate chips, roughly ¼ the amount of the chocolate bar. Stir occasionally until all of the chocolate has melted and it is a velvety texture. Be very careful not to get ANY water in the chocolate or you will have a chocolate disaster.
- While the chocolate is melting, roll your peanut butter mixture into ~1" round balls and set aside.
- Line your cookie tray with the mini muffin liners.
- Once the chocolate has melted, remove it from the double-boiler and thoroughly dry the bottom of the pot holding the chocolate.
- Pour about a ½ - ¾ teaspoon worth of the melted chocolate into each of the muffin liners. You want enough chocolate in each muffin liner to paint up the sides of the liner and make a thin layer of chocolate at the base of the liner.
- Use a very narrow rubber spatula or similar tool to paint the chocolate onto the walls of the muffin liner. Leave ⅛ - 1/16" of muffin liner free of chocolate around the top so that you can easily peel the wrapper off your chocolate.
- Once all the wrappers are coated in chocolate, place your tray in the freezer for five minutes. Keep your melted chocolate warm and melt-y by setting up the double boiler again.
- Remove the tray and place your prepared peanut butter balls into the muffin liners. Gently press down on the peanut butter balls to slightly flatten them and fill the liner.
- Again thoroughly dry the base of your chocolate pot before proceeding to the next step.
- Pour the remaining chocolate over each of your cups leaving about ⅛ - 1/16" of your liner exposed.
- Holding your tray steady, gently place the filled cups into the freezer and let set for an hour.
- Once they have set you will be able to leave them in the refrigerator, but they will melt at room temperature. They will also melt in your hand if you hold on to them for too long, but there is no reason they should be in your hand for longer than a second or two...they should be in your mouth!
Notes
I originally made these with plain peanut butter, but the result was too gooey. Several months ago, I made a recipe for date brownies which I learned from the minimalist baker blog. The dates serve as the base of the brownie. Brilliant idea! I figured the dates would help thicken the peanut butter and it also added sweetness (win-win). Dates are my new miracle ingredient.
Recipe by at https://www.thescratchartist.com/homemade-peanut-butter-cups/